Working with textures
Working With Textures Textures allow the user to map image files onto the surface of a material. There are three ways to do this.
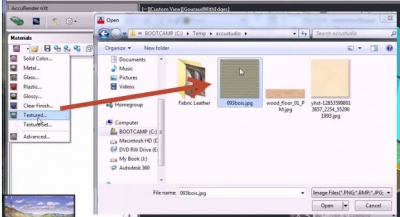
- For a simple texture mapping, go to Materials → New Material → Textured… You will be prompted to select an image to map to the surface of your material. If the image does not tile well, you can select Mirror Tiles to remove the seams.
- For a more sophisticated textured material, go to Materials → New Material → Texture Set… This allows you to import third-party texture maps that contain information such as displacement, normal, or bump maps. Displacement maps cause the material to have depth, which comes at a performance cost. For the appearance of relief without this performance cost, use normal or bump maps.
- For advanced options, either click the Advanced… button in the Texture Set dialog, or go to Materials → New Material → Advanced… and then click on the Texture Maps tab. This interface allows you to control more details, such as the height of the displacement mapping or which colors are masked. It also allows you to add maps and manually set the map type, e.g. Standard, or Displacement. For more information about advanced options, click here.
Non-tiling textures can also be applied directly to objects, bypassing the material altogether, by using decals. Working With Textures