IRender nXt Cloud Rendering Advanced Help
The following Advanced Help is for users of the IRender nXt Cloud Rendering Service. It includes "how to" information as well as tips and notes that will help users get the most out of the service. Users can use Render Plus Support Email to receive further support and information, or checkout our Cloud FAQ section.
Contents
Tokens
Token Cost
Tokens are the “currency” you will spend to render your scenes and animations on the Cloud. One token costs USD 50 cents. We sell tokens in blocks as follows:
- 50 tokens = $25 (minimum purchase)
- 200 tokens = $100
- 500 tokens = $250
See the 'How to Purchase Tokens' section below.
Token Refund Policy
Tokens are time sensitive and not refundable! Tokens not used within any 1 year window are forfeited and the remaining value of the unused tokens is not refunded. However, if you have purchased tokens and, as an example, used some but not the remainder for 8 months, if you purchase another block of tokens, ALL tokens would be valid for 1 year, i.e., even those you did not use for the 8 months prior to the purchase of the latest block.
- Important: No refunds are given for unused tokens.
The Cost of a Rendering via the Cloud Service
The number of tokens you spend will depend on a number of factors:
- The size/complexity of the scene or animation you are going to render (a big factor in the amount of time you set - see below). We recommend you quickly render your scene locally to get a general feel for the length of time you may need for the Cloud to render to the quality you need.
- The size of machine you choose to render on. We enable rendering on Standard (8 core) or Large (16 core) machines on the Cloud.
- The amount of time you choose to render for. The same applies as for rendering you do locally, the more time you render the higher quality the resulting image.
- The number of passes you choose to render for (optional). Only set the number of passes if you have a reasonable idea of the number it will take to produce the rendered image quality you want (we highly recommend you do a quick test rendering on your local machine for any scene or animation). You should use this capability if you want your job to possibly finish earlier than the minutes you set (if the number of passes you set is not reached before your time limit, rendering stops because of the time limit).
Animations (i.e., a compilation of scenes and the number of frames it takes to move from one scene to another) can take significantly longer to render than single scenes. To estimate the time it will take to render an animation, render a single frame locally up to the number of passes to produce the quality you want (setting the number of passes is required for an animation, and this setting is on the Animation tab, not the Cloud tab), then multiply by the time that takes by the total number frames in your animation. You may want to add on some extra time to ensure the animation has time to finish.
- Important: If you do not render your scene or animation for long enough and decide you need to re-render, you will NOT be able to restart the job from the point at which it finished, and you will NOT receive a refund for the tokens spent. If you decide to re-render you will need to change the settings for your job (machine size, time, and passes (optional)) to ensure you achieve the rendered image quality you want. If you set your time for your job for longer than you expect it to need, you can always monitor (click on the image displayed for the job in the Job Monitor to see its progress) and stop the job prior to the time expiring and unused tokens would be refunded.
How to Purchase Tokens
You buy tokens through the Cloud dialog box within IRender nXt as follows:
1) Click the Cloud icon on the IRender nXt toolbar (clicking on the green Render icon or Animation icon will get you to the same dialog box, but you will have to click on the Cloud tab to view the Cloud functions).
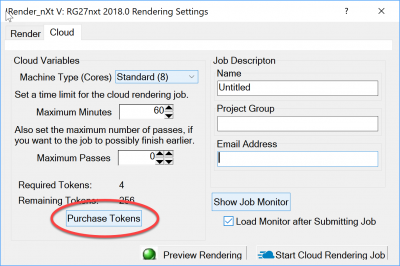
2) Click the “Purchase Tokens” button.
3) Complete the information requested and submit (you will be emailed an invoice/receipt).
4) Once your order has been processed, click the "Refresh" button to the right of “Remaining Tokens”. This will refresh the total to reflect the number you just purchased.

- Important: Your IRender nXt license must be in an "active" status to purchase tokens initially (a permanent license is active for 12 months from the date of purchase and may be renewed for 12 month increments thereafter; subscription licenses are always active). To check the remaining time on your license copy and paste your license number [here]
Setting up your Job before Submitting to the Cloud
Before submitting a job to render on the Cloud you will need to define a few settings to ensure you achieve the image quality you want. As you become more familiar with rendering on the Cloud you will get better at setting up your jobs. We highly recommend you experiment a little to help with your familiarity.
- Note: The same principal applies to rendering on the Cloud as it does to rendering locally on your own PC - it takes time, e.g., complex scenes, scenes with a lot of lighting, etc. may still need hours of rendering to achieve the quality you want.
Machine Power (Cores)
You can render on either a Standard (8 core) or Large (16 core) machine. The Large machine will achieve nearly twice as many passes as the Standard machine in the time you select, but will cost you more, i.e., 15 minutes on a Standard machine will cost you less than 15 minutes on a Large machine (see time/token schedule below). If you are not in a hurry to get the image you want rendered, the Standard machine will work well for you (the image quality obviously still depends on the number of passes the machine achieves in the time you select).
![]()
When either you change the machine type or time, the number of tokens required will automatically update. The following schedule shows you the cost of each machine type/time increment up to the first 3 hours.
Machine Capacity: Standard (8 Cores)
15 minutes = 1 token
30 = 2
45 = 3
60 = 4
120 = 8
180 = 12
And so on (every additional hour costs 4 tokens, i.e, $2)
Machine Capacity: Large (16 Cores) (does not mean this machine is exactly twice as fast as a Standard machine)
15 minutes = 2 tokens
30 = 4
45 = 6
60 = 8
120 = 16
180 = 24
And so on (every additional hour costs 8 tokens, i.e, $4)
Rendering Time
You can select the number of minutes you want to render your model on the Cloud by selecting from the predetermined increments (15, 30, 45, 60, hourly thereafter). Click on the up or down arrows to the right of the field to select the time you want to render your scene or animation for.
![]()
If you enter a number in the field and then click elsewhere on the dialog, we automatically populate the field with the time increment below the time you entered if what you entered is not a standard increment, e.g., if you type in "100" then click elsewhere on the dialog, the minutes will automatically set to 60 (100 minutes is not a standard time increment, so the closest lower increment to 100 minutes is 60 minutes).
As with rendering locally, the more time you let your model render, the better the final image. It really depends on the quality you are happy with, although this can be tough to judge as it will depend on the complexity of your scene or animation. We recommend you quickly verify that you are satisfied with how your model will render on the Cloud by rendering locally for several passes (making sure your lights and other settings are how you want them). A few minutes spent doing this may save you time and money. If you start to use Cloud rendering regularly you will soon be able to judge how long models will take to achieve the quality you want.
- Tip: You should setup more complex jobs to run longer than you anticipate it will take to get the quality of image you want to ensure that you get the desired result. If you set a "Max Passes" value and the job ends sooner than the time you also set, you will be refunded the unused token(s), rounded up to the next standard time increment.
- Important: You cannot restart a rendered image once the rendering time you chose initially ends.
Starting Your Rendering on the Cloud
Once you have defined your variables (machine capacity, time, and passes (optional)) and you have the appropriate number of tokens available (see Remaining Tokens), you can submit your job to the Cloud for rendering by clicking the "Start Cloud Rendering" button (bottom right hand corner of the dialog box).
![]()
Once you submit your job you can follow its progress via the Job Monitor. The Job Monitor will automatically launch if you checked the "Load Monitor after Submitting Job" checkbox before starting the job. The Monitor automatically refreshes the status and statistics related to an active job on the Cloud once every 60 seconds.
- Important: Once submitted, a job goes through a loading and queueing processes before the job actually starts rendering. This process is not instantaneous and may take several minutes depending on the size of your scene or animation and or the load on Microsoft's Azure Cloud service at any particular point in time.
Once you have submitted a job to the Cloud, all other work will be done on the Cloud; nothing is happening locally on your machine (you could shutdown your machine if you wanted).
You can load as many jobs as you like to the Cloud for rendering at the same time, as long as you have already purchased the appropriate number of tokens required to cover them. This is one of the main benefits of Cloud rendering.
The "Job Monitor" Dialog Box
The Job Monitor provides you with information about jobs you have submitted to the Cloud.

The following describes each area of the Job Monitor in detail:
- License no.: Shows your IRender nXt license number. Access to Cloud rendering is available to all IRender nXt customers with an active license. An active license is one that is in the 12 month window from your purchase or renewal date. If you do not renew your license to keep it active, you lose any tokens in your account and no refund is issued. To check the remaining time on your license copy and paste your license number [here]
- Status Filter: This drop down menu allows you to filter the jobs shown in the monitor table by their Status. This is useful if you have been using the Cloud to render a lot of jobs.
- Refresh icon: Allows you to manually refresh the list of jobs, including the status of each.
The Job Monitor table shows you all of the jobs you have submitted to the Cloud for rendering, and their status. The columns include the following information:
- Job ID: This automatically generated number is assigned to each job for identification purposes.
- Job Name: This is the file name you created for this job.
- Status: The Status is dynamically updated once every 60 seconds when a job is active on the Cloud (it can also be refreshed manually by clicking the refresh button).
- Active, Queued – You have submitted your job and it is currently in a queue to start rendering. This queued status typically only lasts for a few minutes at most.
- Active, Running – The job is being rendered.
- Complete – The job has finished rendering and is available for you to download and save.
- Completed, Downloaded – The job has been downloaded.
Selected Job Area
The "Selected Job" area on the Monitor dialog box enables you to follow the progress of your job as it renders on the Cloud (in addition to the Status changes that are reflected in the job list above this area). It also provides functions allowing you to stop a job prior to completion (Note: you cannot re-start a job at the point at which you stopped it), remove a job from the job list, and download and save a job after it has completed rendering.
- Rendering Statistics: The area immediately below "Selected Job" displays core statistics related to the job you have clicked on in the job list above. These and other statistics are also included in the rendering information displayed if you click the "I" button further below. If you click on a job that is in the process of being rendered, the statistics are dynamically updated once every 60 seconds (alternatively, you can click the Refresh icon at any point).
- Stop button: Clicking this button stops the rendering process for the job highlighted in the monitor table. The job cannot be restarted from the point at which you stopped it, and there is no refund of tokens for the time used up to point where you stopped the job, even though you didn't finish your job (unused tokens will be refunded). Note: You can only download images in .JPEG or .PNG formats if you stop a job part way through. A job must "Complete" using your original job settings in order to download .AlphaPNG or.nXtImag images.
- Remove button: Clicking this button results in a new dialog box being displayed asking you whether you really want to delete the highlighted job from the monitor table. Be sure to download and save the job before removing it from the monitor as this also permanently deletes the image stored on the Cloud. Note that if you do not remove completed jobs, the Job Monitor response time will become slower.
- Rendering Statistics ("I") button: This button launches a separate window in which you can see additional statistics about your job (over and above those displayed above the button under "Selected Job").
Downloading your Job from the Cloud
Once the Status of your job shows "Complete" you can download/save it locally. If you do not "Remove" a job from the monitor table, the rendered image will still be accessible on the Cloud. However, we highly recommend that you download and save your completed job locally.
- Download Image button: This button launches File Explorer which allows you to choose a destination folder in which to download/save your completed job.
- File Type dropdown menu: The File Type dropdown menu lets you download your completed job in several formats: .JPEG, .PNG, .AlphaPNG, and .nXtImage. You can download a completed job more than once if you want to have it available in more than one of these formats. Saving a job with the .nXtImage extension enables you to make post-rendering changes using IRender nXt.
- Open Folder icon: This icon will become active once you have downloaded the model and the job remains in the job list. When you click on the icon it takes you directly to the folder to which you downloaded the model.
- Arrow icon: This icon will be active once you have downloaded your job. When you click on this icon it opens the image in the program you have assigned on your PC to view and or edit images.
See also
IRender nXt Cloud Rendering Service
Frequently Asked Questions