Render Farm
The IRender nXt Render Farm
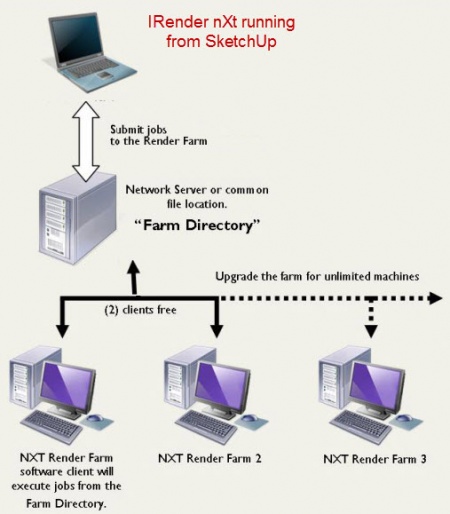
A Render Farm consists of a group of networked computers working together to complete large rendering tasks. Render farms proceed silently, without graphically displaying the renderings as they progress, or you can run the Render Farm Display tool to display parts of the image as they are completed. Using the Render Farm allows you to use more compute power for lengthy tasks at the expense of some interactivity.
The IRender nXt Render Farm Software is sold separately from IRender nXt itself. (However a 2-CPU Render Farm is included with the 3D Design Studio ). Also A 30-day 2-CPU trial is available for testing.
Neither SketchUp nor IRender nXt itself are required on computers which will only be used for rendering farming.
Contents
Technology
The nXt Render Farm includes four pieces of software:
- IRender nXt is used to define the model to render. The Render Farm can be started directly from IRender nXt, or if you prefer to preview the rendering first you can start a preview rendering (with smaller resolution and fewer passes), and then start the Farm from IRender Batch.
- The Farm itself, (nXt.exe ornXt64.exe, running on each Farm CPU). This is a version of the nXt rendering engine which renders nearly silently, in the background, with very little user interface. This portion of the nXt Render Farm Software can be used by itself, in conjunction with commercial render farm software, for a more sophisticated render farm solution.
- nXtFarmer.exe (nXtFarmer64.exe) is a small executable that runs on each network rendering station, waits for jobs to be generated, and starts the Farm Processor.
- IRenderBatch.exe is a utility program to display renderings as they are completed and save them as .JPG, .PNG or .ArImage files.
Downloads
You can download the IRender nXt Render Farm software from the McNeel nXt Forum:
Be sure to download the version to match your operating system (32 bit or 64 bit)
Note:Do not purchase a Render Farm directly from McNeel. To use the Render Farm with IRender nXt, you need to purchase the Render Farm and interface software from Render Plus. See: Render Farm Purchase
License and Purchase
You can use a 2-CPU Render Farm in trial mode for 30 days.
After 30 days, you will need to purchase a 2-CPU License, or an unlimited CPU license, from Render Plus.
The 2-CPU License for the Render Farm is also included in the 3D Design Studio .
- See: Render Farm Purchase
Installing and Configuring the Render Farm
Create a shared folder for use by the render farm. (Create a folder on a machine which is accessable by all the other machines which will process or use the Render Farm)
All of the network rendering computers must have read/write access to this folder. The shared folder should have a lot of available disk space to store both data (input) and images (output.) 20 - 200 GB of available storage are recommended. You must perform the following four steps on each computer you plan to use in the render farm, including any nXt workstations which will submit jobs to the render farm:
- Install the nXt Render Farm Software.
- From the Start menu, run the Render Farmer on each machine. The Render Farmer will appear as an icon in the system tray.
- Right click on the icon and select Restore. A window title nXt Farmer should appear.
- Select Options→Path… from the menu and select the path to the render farm. The Farmer window can now be minimized to the tray.
The Render Farm is now configured. To verify that the farmer machines are responding run the Render Farm Monitor from the Start menu on any of the workstations. The machines should appear in the Configure Machines window. If you wish to exclude a machine from participating in the render farm, you can select it, right click, and choose Suspend.
Submitting a Job to the Render Farm
There are two modes to start a Render Farm job:
- Start the Farm directly from SketchUp, or
- Do a preview render first, and start the Farm from IRenderBatch.
Submitting a Farm job directly from SketchUp
Perform the following steps to submit a job to the render farm:
- Configure your model and rendering parameters in the usual way.
- Press the Farm button on the toolbar to show Render Farm parameters.
- Choose to either run the job Start Now, Manual, or Start at Specified Time. If you choose “Manual” you will need to use the nXt Render Farm Monitor to manually start the job. See: Setup below.
- Rows per farm slice (default 32) determines how many sub-tasks to slice the job into. See: [#Setup|Setup]] below.
After the job is complete, output can be found in the job's Output folder.
Preview the rendering first
- Start your rendering normally from SketchUp. (Perhaps at a smaller resolution or with fewer passes)
- Examine the rendering. Make changes to materials, settings, etc. if desired
- Use Farm Icon to start the Farm from IRender Batch.
Submitting a Render Farm Job
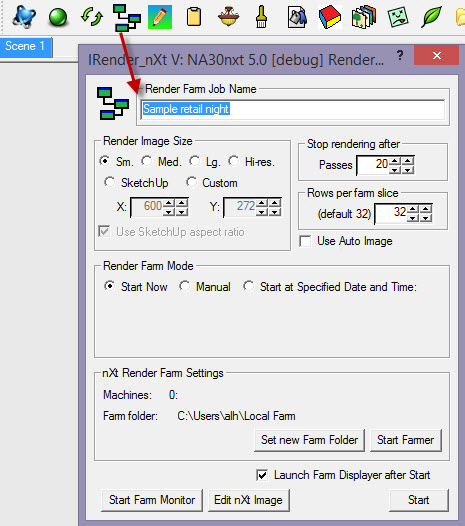
The Render Farm Settings Wizard used to define settings for the Render Farm and to start rendering a model with the Farm.
Render Farm Job Name
- Name the job or accept the default. The date and time is automatically pre-pended to the name you choose. A sub-folder for the job is created in the Render Farm shared folder. An Output folder is also created in the new job folder.
Render Image Size
- This is the size which will be used for the Render Farm rendering.
Stop rendering after
- You must specify how many passes to use before stopping the rendering.
- There is corresponding setting for a time limit.
Rows per farm slice (default 32)
- Determines how many rendering rows will be assigned to each farm task.
- The total number of tasks should be at least twice the number of cores on all of your machines to ensure maximum usage of all machines.
- The default value of 32 rows per slice will work well unless you find you are not using enough of the cores on your machines.
Use Auto Image
The .nXtImage and .JPG (or .PNG) file will automatically be created when the task is complete.
(This is probably not working yet)
Render Farm Mode
- Start Now - the Render Farm will be started immediately (after extracting and preparing the model.)
- Manual - The model will be extracted and processed, but you will have to activate it later in the Farm Monitor.
Start at Specified Time - enter a date and time for starting the job.
Start Farm Monitor
Starts the Farm Monitor, or gives it focus if it is already running.
The Farm Monitor shows the status of current Farm renderings.
Launch Farm Displayer
If this is set, the Render Farm Display window will stay up after the job is started. This window will display each slice of the rendering as it completes.
If this is unchecked, you will have to use the Start Farm Monitor button to track progress of the Render Farm and display partial, or completed images.
Start
Click Start after you have made any changes to the settings to start the Render Farm process.
- See: Render Farm Monitor
Fequently Asked Questions
- I am not seeing the farm icon in my toolbar. It is ticked in the toolbar config area and I have the farm software installed. What else do I need to do?
- Have you installed the Render Farm on the machine where you are running SketchUp.
Even if the machine running SketchUp is not gong to be used as an active farm, the farm needs to be installed.
- Have you installed the Render Farm on the machine where you are running SketchUp.
See also
- Render Farm
- Render Farm Monitor
- Frequently Asked Questions