IRender nXt Tutorial - Animation
High quality animations of SketchUp models can be made with IRender nXt or IRender SU.
Animation is the "filming" of a sequence of positions of scenes to create an illusion of movement. The "filming" is done by rendering individual frames when moving from one scene to another, then compiling them into an animated movie. This creates an optical illusion of motion due to the phenomenon of persistence of vision.
Creation Time. Rendering for an animation can take a long time as each frame is an individual rendered image. The times and delays specified for each frame are used to time the animation. You specify the number of frames per second and the image size. Note that you do not need to render at a high quality for animations given the limitation of the human eye as it tries to keep up with each frame as each one is only displayed for milliseconds (depending on your animation settings).
Experiment! One of the most important things you can do to mitigate the rendering time is to take time up front to experiment with your model to ensure you optimize your settings. These settings will vary from animation to animation based on the complexity of your model. The more complex your model the longer it will take to render at the quality you want, so the time you set for a frame to render will vary each time you set up a new animation (unless your models are very similar in complexity).
Animation is not available in ArielVision. See the Feature Comparison chart for a full list of IRender nXt and ArielVision features.
Contents
- 1 Tutorial
- 2 Step 1 - Launching the Animation Function
- 3 Step 2 - Scenes to Include
- 4 Step 3 - Frame Size
- 5 Step 4 - Stop rendering after Passes (IRender nXt) or Seconds (IRender SU)
- 6 Step 5 - Animation Timing
- 7 Step 6 - Animation frame image files to create and Base Frame Image Number
- 8 Step 7 - Other Options / Buttons
- 9 Step 8 - RPS Create Animation from Image Set File Dialog
- 10 Settings Tab
- 11 Restarting an Animation
- 12 Animation Example
- 13 See also
Tutorial
It is best to learn how to create an animation with a small model. You need to setup a minimum of 2 scenes in your SketchUp model.
Important: Animations can take a long time to create. We recommend you take time to do some testing first with fewer frames per second or at a lower image quality before creating the final animation.
Step 1 - Launching the Animation Function
Click the Animation icon on the IRender nXt or IRender SU toolbar ( ) to load the Animation Wizard.
The General Tab
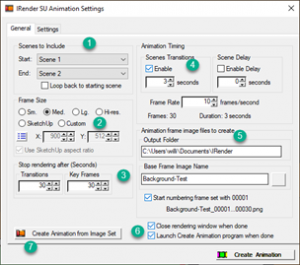
The General tab provides the options available to you to create a movie made from the different scenes you create in your model. This tab has the following distinct areas in which you setup your animation project's parameters.
- 1. Scenes to Include
- 2. Frame Size
- '3. Stop rendering after (Passes) in IRender nXt or (Seconds) in IRender SU
- 4. Animation Timing
- 5. Animation frame image files to create and Base Frame Image Number
Step 2 - Scenes to Include
There must be at least two scenes in the SketchUp model to create an Animation. The order in which scenes are displayed in your model is the order in which they will appear in the animation process.
Start: Select a scene for the start of the Animation.
End: Select a scene for the end of the Animation.
Checkbox - Loop back to starting scene: Click the checkbox to add an extra scene which will loop the animation back to the start scene at the end of the final scene.
Step 3 - Frame Size
The Frame Size allows you to set the resolution at which you will render each frame to be used in the animation. The higher the resolution the more time it will take to render each frame (frames do not need to be rendered at a high resolution as the eye cannot detect that level of resolution once they are compiled into a movie). You can see how many individual frames (images) will be rendered from your settings in the Animation Timing area.
Tip: If you have a large model consider using a smaller resolution to get an idea of how long it might take to render your Animation and to make sure it is rendering as expected.
Step 4 - Stop rendering after Passes (IRender nXt) or Seconds (IRender SU)
These settings set the time (in IRender SU) or passes (in IRender nXt) to process each frame through the rendering engine.
Tip: We highly recommend you experiment with these settings before starting your “production” animation.
Transitions: Transition Frames are the individual frames (images) that are quickly shown one after another during an animation providing the viewer with the movie-like experience. These frames do not need to be rendered to a high quality as the viewer will be unable to discern it given the speed at which eyes process moving images. Type your rendering time (IRender SU) or passes (IRender nXt) in the field or use the up/down arrows to the right.
Key Frames: A Key Frame is the last frame rendered in a scene. This is the “Elapsed Time” for which each Key Frame will be rendered. Consider rendering Key Frames for longer than the Transition Frames as the quality will be more discernible to the viewer (the Transition Frames will move quickly during the movie and do not need to be high quality) given that this frame may be seen for a second or two before the start of the movie in the next scene. Type your value in the field or use the up/down arrows to the right.
Tip: Set Key Frames to a higher value to get a better rendering, but set to 20 or less while testing lighting and appearance.
Step 5 - Animation Timing
These options control how many “frames” need to be rendered to create the length of animation you want. Determine how many frames you need to render in a scene to ensure a smooth viewing movie. Too few frames will result in a noticeably “jerky” movie.
Note: These options do not identify how long it will take to render the number of frames your settings determine will be needed for your movie. This is set under the "Stop rendering after ..." area.
Tip: We highly recommend that you spend time setting up your animation rendering before starting to render all of the frames. This will likely save you time and frustration in the long run! Determining how long to render your Transition Frames for is critical - it could save you hours as, depending on the length of your animation, you may need to render hundreds of frames (images).
Scenes Transitions:
Checkbox - Enable: Scene Transitions is normally enabled, unless you only want to render the Key frames for each scene. This setting specifies the time it takes to move through each scene in your animation.
Seconds: Type in, or use the up/down arrows to the right of the field, to specify the duration of the transition time between scenes.
Scene Delay:
Checkbox - Enable Delay: Check this if you want the animation to pause for a certain period of time before it starts again in the next scene.
Seconds: Type in, or use the up/down arrows to the right of the field, to specify the duration of the delay before moving to the next scene and restarting the animation.
Frame Rate: Number of frames per second for the animation. Keep frames per second to the minimum necessary to give you a smooth movie effect (as each frame is a separate rendering).
Frames: This is the number of frames (individual renderings) that will be created for your movie based on your “Scenes Transitions”, “Scenes Delay”, and “Frame Rate” settings.
Duration: This is how long the movie you are creating will run for and is calculated based on the “Scenes Transitions”, “Scenes Delay, and “Frame Rate” settings.
Step 6 - Animation frame image files to create and Base Frame Image Number
Output Folder: This is the path of the folder to which the animation frame images will be saved.
Base Frame Image Number: This is the name used for all frames to numbering is sequentially appended.
Checkbox - Start number frame set with 00001: If checked, the sequence images will begin with 00001. Uncheck this if you want to render and number sets of scene transitions separately (to assemble later). This also helps when performing a Restart if the animation process was interrupted.
Step 7 - Other Options / Buttons
Checkbox - Close rendering window when done: Uncheck this if you want to examine rendered results and settings.
Checkbox - Launch Create Animation program when done: When checked this will automatically launch our program to create the movie file (options/settings available via the Create Animation from Image Set button). Uncheck this if you use a different program to assemble your movies.
Button - Create Local Animation: Clicking this button will start the process of creating your animation video on your PC.
Button - Create Animation from Image Set. Clicking this button launches our program for creating movies from saved images (options/setting available via the Create Animation from Image Set button).
Button - Create Cloud Animation (IRender nXt only): Clicking this button will start the process of creating your animation video on the Cloud. Cloud settings are under the Cloud tab on the dialog and should be set before clicking the Create Cloud Animation button.
The RPS Create Animation from Image Set dialog is displayed when either the Create Animation from Image Set, Create Cloud Animation (IRender nXt only), or Create Local Animation buttons are clicked.
Step 8 - RPS Create Animation from Image Set File Dialog
1. Animation Image Files
Select frames (rendered images) to use to create the movie. Note: Images must be consecutively numbered starting with a suffix like “_0001” or “_00001”.
Folder: Displays the path for the location from where the images to be used to create the movie will be pulled. You can alter this path if needed.
File Name: The program will automatically determine if there are files that meet the criteria for creating the movie. If there are valid files, the number of frames found will be provided with sequential numbers used in creating the movie. If there are no valid files found you will get a message stating: “No qualified numbered frames found. Browse for image set.”
2. Movie File to Create
Specify name and location of movie file to create.
Folder: Path for the location where the movie will be stored upon completion.
File Name: File Name of the movie. The file extension will reflect the radio button selected under the Video File Type area (see below).
3. Video File Type
Click on a radio button to select the Video File Type you want to save the movie as. The extension chosen is appended to the File Name in the Movie File to Create area.
4. Other Options
Avi Compression / Codec: Full Frames - Uncompressed

Button - Edit: Clicking the Edit button displays a dialog enabling advanced settings for Video Compression.

Frame Rate: Frames per second.
Checkbox - 5. Open Animation when completed: If checked the movie will automatically open once the creation process has completed.
Button - Create: Clicking the Create button starts the process of creating the movie based on your settings.
Settings Tab
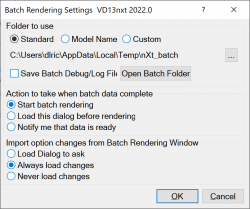
Button - Modify Batch Settings: Clicking the Modify Batch Settings button displays a dialog (below). Animations are created by a process separate from SketchUp. This allows you to exit SketchUp and the animation will continue (if using the Cloud capability in IRender nXt animation processing is done entirely on the cloud remotely from your PC). You can also set the Batch Mode to delay starting the animation, which would allow you to start the animation in a different computer.
Radio button - Modify Batch Settings Dialog
Radio button - Standard: Saves the Batch Folder in the TEMP directory. The box to the right of the path name is not available when in Standard option mode.
Radio button - Model Name: Saves the Batch Folder in the User application folder using the model name as the Batch Folder name. Click on the box to the right of the path name to change to a local folder of your choice.
Custom: Specify the Batch Folder name. Click on the box to the right of the path name to change to a local folder of your choice.
Checkbox - Save Batch Debut/Log File: Save the Batch process log file.
Button - Open Batch Folder: Open the Batch Folder in Microsoft File Explorer.
See: Batch Rendering
Further Options on Settings Tab
Checkbox - Reposition “Always Face Camera’ Components: Set this option to recalculate the position for “Always Face Camera” components for each frame change.
Checkbox - Lock Tone Operator Brightness: Set this tone operator value when rendering subsets of an animation, to eliminate flickering due to lighting changes.
Average Illumination: You can get the Average Illumination to set for a rendered scene from the Statistics dialog for a rendered model. If this value is set to 0, and Lock Tone Operator Brightness is set, we use the value from the first frame rendered.
Checkbox - Save PNG images as alpha images: Creates transparent frame images.
Restarting an Animation
The restarting an animation process would normally be used if the original process you started stopped for some reason and you wanted to make use of the frames rendered prior to the stoppage. This is especially helpful when you have a large number of frames/scenes needing to be rendered for the animation and don’t want to have to start from the beginning.
IMPORTANT: IF YOUR ANIMATION PROCESS FAILS UNEXPECTEDLY:
● Do not make any changes to your model!
● Do not start a new Animation process!
● Do not delete the .jpg files that have already been completed!
Instructions for Restarting an Animation
The following provides information on how to restart an animation from the point where the process stopped, for whatever reason.
a. Open SketchUp and then the model you were using to create the animation.
b. Click the Animation icon on the IRender nXt or IRender SU toolbar.
c. In Microsoft File Explorer, locate the directory where your Animation files were being created, e.g., C:\Users\willi\Documents\IRender. See Output Folder on the RPS Create Animation from Image Set File dialog.
d. Once located, look at the list of files for your animation and make a note of the last file name that was created, e.g., the last filename is: Background-Test_00033.png (see image below). “00033” is the sequence number of the last .png file created.
e. Now identify which scene was the last one being processed when the animation process stopped. Click the Animation icon on the toolbar to open the Animation dialog.
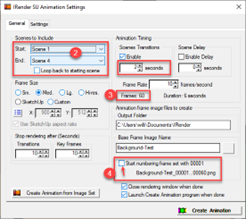
f. Note the Start and End Scenes. They should be the same as when you initially setup the Animation.
g. You can see the number of frames that will be created based on your settings. Do not change any of the settings from the original animation process.
h. Ensure the “Start numbering frame set with 00001” checkbox is unchecked. Make a note of the files that would have been created during the initial Animation if the process had not been stopped.
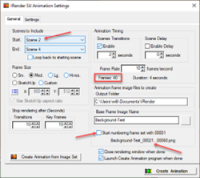
i. In order to determine what Scene was being processed when the animation stopped you will need to change the “Start” Scene to find the Scene where the sequential number of the animation filename is greater than the last frame created. In the example, the last filename processed is “Background-Test_00033.png”. Changing the Start scene to “Scene 3”, the next scene to process would have been: “Background-Test_00041.png”
j. This means the Start scene needs to be changed to “Scene 2” in order to ensure all frames are processed during the restart. Changing the Start scene is the only change you need to make. All other settings should not be updated when performing a restart.
k. You will notice the number of Frames that will be processed has changed to a lesser number. In this example the number of frames changed from 60 to 40.
l. Click the Create Animation button to start the Animation rendering.
Tip: You can go to the output folder in Microsoft File Explorer so you can keep an eye on the files being created - each frame will list in the folder as and when they complete. The files that were originally created should not be affected. The frames will continue to be processed sequentially until the final scene has finished.
In the original animation process example, there were 60 frames to be created. When restarted, 40 frames were to be created. When the restart animation process finished, we have 60 frames.
Once the animation processing finishes you will be presented with the dialog which will allow you to create your movie from the images created during the animation rendering.
Animation Example
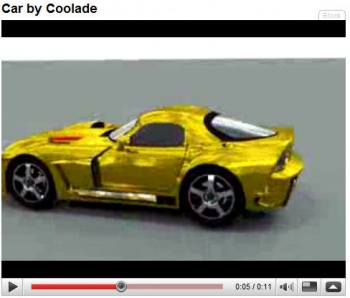
Watch this animation on YouTube

